blog · git · desktop · images · contact
jenny + mutt: Getting started with twtxt
2021-09-19
Previous blog post on this topic.
twtxt is a simple format for running a “microblog”. It’s a bit like Twitter or RSS/Atom feeds, stripped down to the bare minimum. Since its inception in 2016, it has changed a bit – mostly because Yarn.social (formerly twtxt.net) has introduced the concept of threads in 2020. There has been a number of twtxt clients back in 2016, but none of them have been updated to support this extension (at least I’m not aware of any). So, how do you use twtxt these days, if you want to get a console text-UI experience?
One option is to use jenny, the client that I use myself.
jenny’s README contains setup instructions, but here’s a quick walkthrough with screenshots anyway.
Getting the code
jenny is supposed to run only on your local machine, not on your server on the internet, so run this on your local workstation:
$ git clone https://uninformativ.de/git/jenny.git
$ cd jenny
$ git checkout v22.01
The command above explicitly jumps to release v22.01, because this
blog post was written for that release. Since then, there might have
been changes. Of course, you can use newer releases or the current
main, if you like, but if you do, then please read CHANGES to find
out what has changed since v22.01. This blog post won’t be updated for
newer releases.
Install the dependencies through your distribution:
# pacman -Syu python-dateutil python-requests
This should work now:
$ ./jenny --help
Or do something fancy like setting up a virtualenv or what not.
Setting up your twtxt feed
You will have to start by creating an empty feed file locally on your computer. It’s not actually empty, but it will contain at least two lines of metadata, like this:
# nick = cathy
# url  = https://my.server.com/twtxt.txt
Let’s save this file to ~/web/my.server.com/twtxt.txt on your machine,
assuming that the directory ~/web/my.server.com contains your normal
web site.
jenny will append new twts to this file. It will then run some command
to publish this file to a server on the internet. Both of them have to
be configured in your ~/.config/jenny/conf.json file:
{
    "maildir_target": "~/Mail/twt",
    "local_twtxt_dir": "~/web/my.server.com",
    "publish_command": "some-rsync-script"
}
publish_command is a script that you have to write yourself, because
it very much depends on your setup. You can simply run scp to copy the
file to your server and be done with it. Or you can git commit it and
then git push it. Or you can set it to /bin/true, because you have
decided to run all of this directly on your server after all. It’s up to
you.
Once you have done all that, run jenny to see if it’s working: It
should put you in your $VISUAL editor where you can compose a new twt.
Just write hello world for now, then exit the editor. Afterwards,
check ~/web/my.server.com/twtxt.txt for the new entry and also check
https://my.server.com/twtxt.txt to see if your feed got published
properly.
Setting up the mutt integration
The steps above will allow you to write twts and publish them. But you will probably want to read other people’s entries, too. This is where mutt comes into play.
mutt is actually a mail client and has nothing to do with twtxt. But the thing is, it is very good at displaying and handling threaded conversations, and it’s also very customizable. That’s why jenny writes its data into a maildir and mutt operates on that. Usually, you don’t launch jenny directly but mutt – and then mutt will make the appropriate jenny calls.
Here’s a full configuration file for mutt that integrates jenny (which
must be available in your $PATH):
# Strictly necessary or highly recommended.
set mbox_type = Maildir
set sort = threads
set sort_aux = date-sent
set strict_threads = yes

# Optional styling.
color index yellow default ~P
set index_format = "%Z│%-15.15F│%3M│%s %* │%[%Y-%m-%d %H:%M]"

# To highlight messages sent by you.
alternates cathy

# Key binds for jenny: Alt+T to write a new twt, Alt+R to reply to
# thread, Alt+F to reply in a forked thread.
macro index,pager <esc>T "<shell-escape> jenny<Enter>" "Write new twt"
macro index,pager <esc>R "\
<enter-command> set my_pipe_decode=\$pipe_decode nopipe_decode<Enter>\
<pipe-message> jenny<Enter>\
<enter-command> set pipe_decode=\$my_pipe_decode; unset my_pipe_decode<Enter>" \
"Reply to current twt"
macro index,pager <esc>F "\
<enter-command> set my_pipe_decode=\$pipe_decode nopipe_decode<Enter>\
<pipe-message> jenny -t<Enter>\
<enter-command> set pipe_decode=\$my_pipe_decode; unset my_pipe_decode<Enter>" \
"Reply to current twt (fork conversation)"
And then you launch mutt (you probably want to create some sort of shortcut for this):
$ mutt -F ~/.muttrc-jenny -f ~/Mail/twt
Note to people who are already using mutt: This whole mutt setup can exist independently of your normal mutt configuration.
Vim completion
This has been added a while ago, but it’s beyond the scope of this
article. Please refer to the vim/ subdirectory in the repo, there’s a
README.
Replying to twts
When you launch mutt, you should see something like this:

Those are the existing twts that jenny created while I was toying around during the setup steps.
Let’s select the last one and hit Alt+Shift+R to create a reply. mutt
will launch jenny, which will then throw you into your editor:
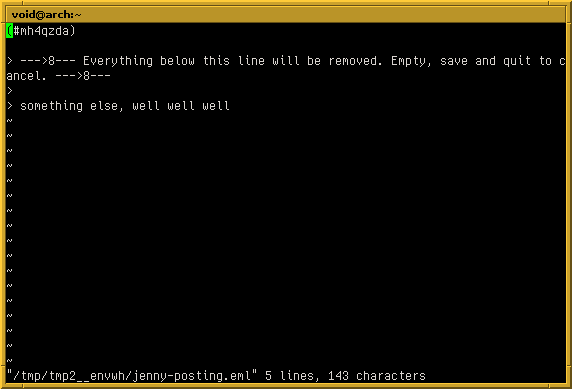
You’ll see a “snip” line. Anything above it will become your new twt.
That area (above the snip line) will sometimes be pre-filled with
certain information. It’s common to include the user name of the
original author, which jenny usually does for you. Including a subject
hash like (#mh4qzda) which is required to actually create a thread.
jenny will compute this hash for you. Once you save and quit, you should
see this:
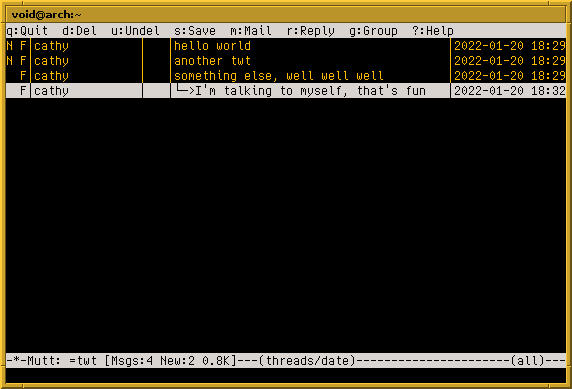
Notice how mutt automatically groups those two twts into a threaded hierarchy.
Writing new twts is done similarly, you just hit another hotkey in mutt.
Following other people’s feeds
To follow someone else, create the file ~/.config/jenny/follow. The
format is as follows:
$name $url $optional_flags
As an example, you can use this:
sandra https://www.uninformativ.de/twtxt-blog-example.txt
Yes, sadly, you have to include the user name in your local config. The
twtxt protocol does not require other people to include a nick line
in their feed (but if it exists, jenny will use it).
Let’s ignore the optional flags for now and refer to the README.
To fetch those feeds, you need a cronjob, a systemd timer or something else, that runs this:
$ jenny -f
For the sake of this example, we’re going to run jenny -f manually
now. Then back to mutt and you should see the twts of the other feed:

And now the colors start to make sense. Twts in yellow are your own twts. That “📣” is an indicator of someone mentioning you.
And that’s basically it. Congratulations and welcome to the twtiverse!
“Ugh, that’s too complicated!”
If you want to join twtxt and don’t want to do anything special (no self-hosting, no nerdy toys for your terminal), you can just join one of the existing Yarn.social pods, like https://twtxt.net/. Create an account, done. They even have an app for Android and iOS, called Goryon!
But be aware that the point of twtxt is to self-host. That’s why it’s so simple (from a technical point of view). So, if you have the technical skills to do self-hosting, then you should.
And if you don’t want to run an “ancient” console program, you can set up your own Yarn.social pod instead to get a full-featured web application.